EQ Basics for Your On-Ear Lavalier
3 Tips to Get Started
The sound quality of an EMBRACE on-ear lavalier can be remarkably transparent. While the mic appears far from the mouth, it can be closer to the mouth than a lapel-worn microphone in a lot of cases. Every audio system is unique, with its sound performance influenced by the speaker’s voice, room acoustics, and loudspeaker placement. All of these play a critical role in performance so pay special attention to the following:

1. Acoustic Characteristics
Acoustic characteristics, such as echo or reflections can impact audio clarity in negative ways. If your space has reverberation and echoes that are not suitable for your specific performance criteria, acoustic absorption treatment can help mitigate these negative effects.
2. Speaker Setup
Proper loudspeaker placement is essential to avoid feedback. Keeping the loudspeaker’s coverage areas focused on the listeners and avoiding the presenter will help mitigate feedback.

3. Sound System Adjustments
A. Choose the Proper Microphone Sensitivity
Selecting the correct microphone sensitivity is crucial for capturing clear, distortion-free audio. A mic that is too sensitive may pick up excessive background noise or cause clipping in louder environments, while a mic with lower sensitivity might struggle to capture softer speech with enough clarity. By choosing the right sensitivity level for your application—whether for speech, singing, or high-volume performances—you ensure the best balance of sound quality, signal-to-noise ratio, and overall system performance.
Below is a general guide to selecting the best microphone option based on application:
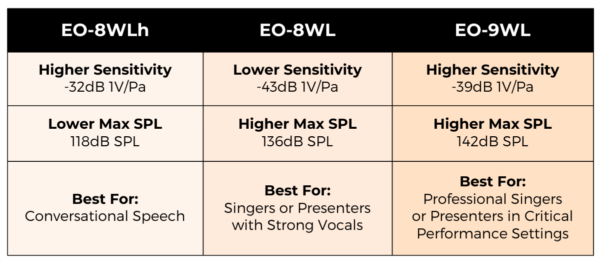
- Recommendation for Speech: Use a higher sensitivity omni mic, such as our EO-8WLh, designed specifically for speech-level applications.
- Recommendation for Singing or Loud Vocals: Choose the EO-8WL, which has a lower sensitivity but a higher max SPL to handle louder sound levels effectively.
- Recommendation for Singing and Speech: Choose the EO-9WL which has the highest max SPL and higher sensitivity to provide the widest dynamic range.

B. Adjust the Body-Pack Sensitivity
Sensitivity settings on your transmitter is key to ensuring your signal to noise ratio is acceptable as well as having the microphone capture audio without distortion. Adjust the sensitivity control on the body-pack transmitter based on the loudness of the speaker or performer.
C. Align the Output Level of Your Wireless Receiver
The output level of your wireless receiver should match the input level of your sound system for optimal signal-to-noise ratio and linear gain control. Confirm and adjust the output level on your wireless receiver to align with your sound system's input requirements.
D. Begin with Flat EQ Settings
With any new tool or microphone placement, it is generally good practice to start with your input channel equalization flat. After you get your gain settings set, then you can adjust the EQ to fit your spectral preferences.
- Begin with flat EQ settings (no adjustments) on your input channel.
- Set your gain levels.
- Adjust the EQ to fit your specific preferences for tonal balance and clarity.
E. Select Proper Mic Placement
The EMBRACE on-ear lavalier has several variation in it's wearing style to support the best mic placement to improve clarity and gain-before-feedback. Extending the mic from the front of the EMBRACE mount in the over-the-ear brings the mic closer to the mouth. Alternatively, wearing the under-the-ear can get the mic even closer to the source and aide in achieving a better gain before feedback ratio.
- Use the EMBRACE mic in either the over-the-ear or under-the-ear configuration.
- Extend the mic from the mount to position it closer to the speaker’s mouth.
- Aim for a position that is close enough to capture clear audio but far enough to avoid breathing or plosive sounds.
Best Practice Summary
As with all microphones and audio system setups, adjustments are key to tailor them to the mic user and the space. Here are some best practices for an initial setup:
- Start with your channel equalizer set to flat.
- Make sure your presenter is not standing in a place that is covered by the house sound system.
- Do not have any presenter mic signal routed to the Foldback “monitor” systems.
- Position the mic as close to the source as it needs to be to mitigate gain before feedback issues.
If the acoustics or loudspeaker configuration in your space still present gain before feedback challenges, consider using a traditional boom headset mic like our omni GO-9WD headset mic, CO-8WD headset mic or the cardioid CR-8D headset mic.

